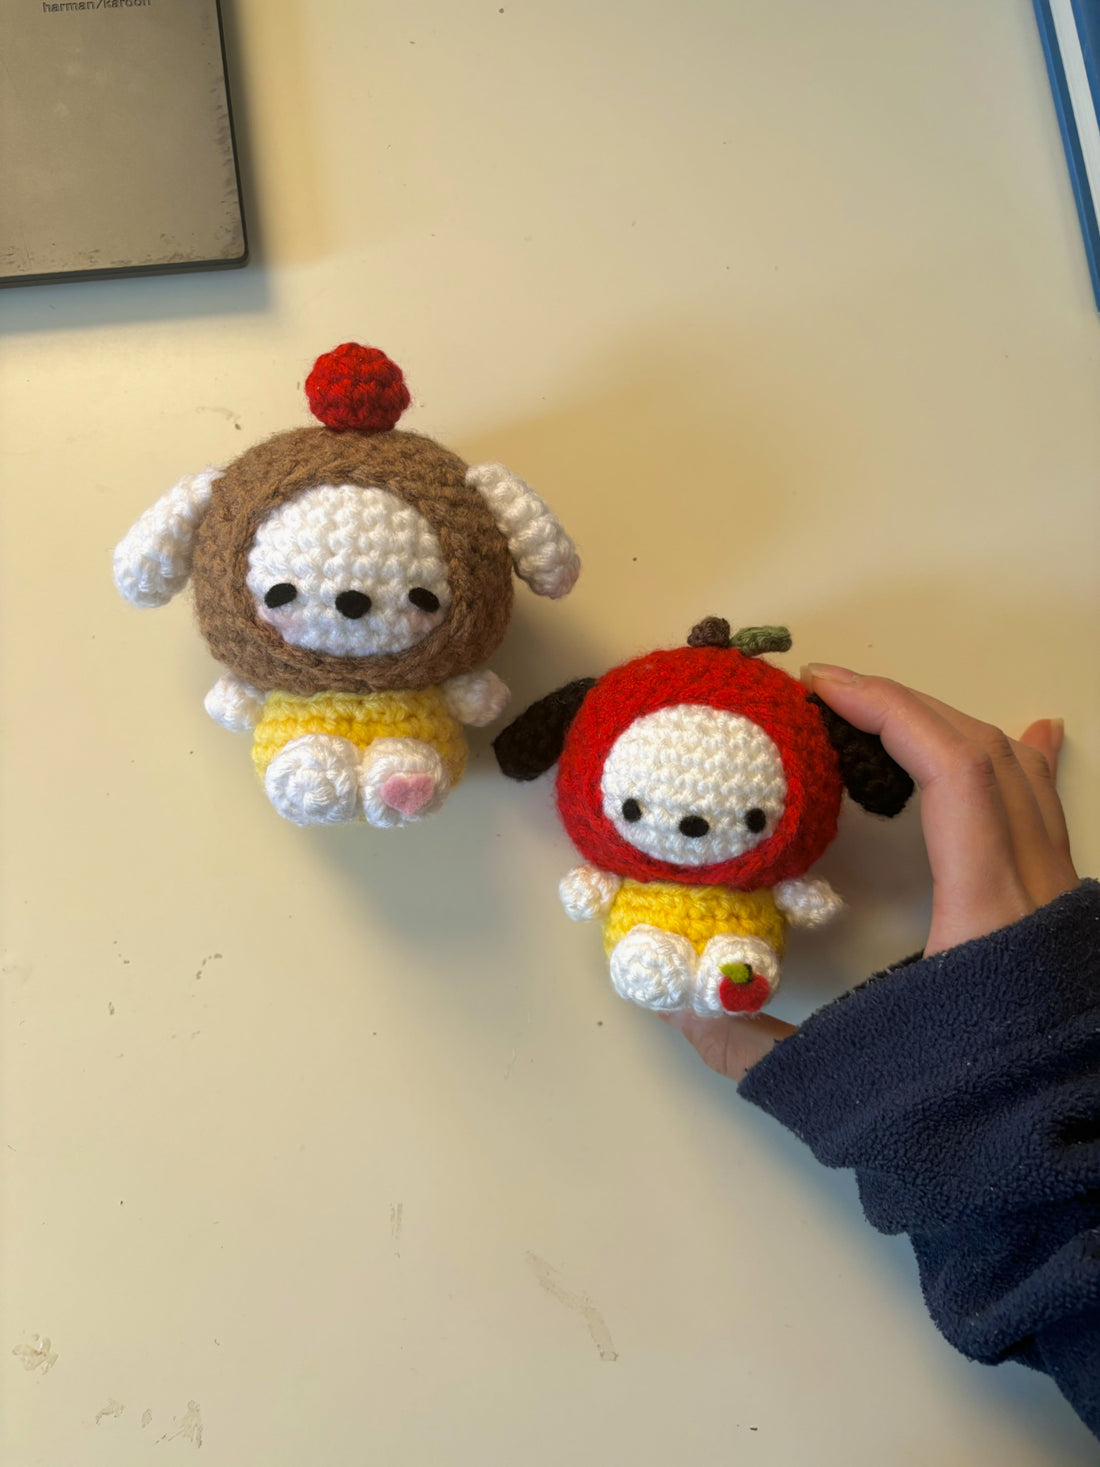
Apple / Purin Dog 2-in-1 Free Pattern
Hi there! By the time I’m writing this I almost hit 20k followers on Instagram. As a way to thank you all for following my journey and your continued support I wrote this free Apple Dog pattern !
One of my favourite characters (which is also why I have him as my profile pic :3) and so I thought it would be the perfect pattern to celebrate this milestone with! :]
I created two versions: Apple Dog and Purin Dog. Purin Dog was born because initially I freehanded Apple Dog with different yarn sizes, and the colors of Purin Dog were the only colors I have at the moment with the same/similar yarn size, so you don’t have to worry about using different yarn sizes :D
Once again thank you so much for sticking around, I hope you enjoy making your own Apple/Purin dog and I’m excited to see your creations! <3

This pattern is only for personal use. Do not copy, edit, redistribute or sell this pattern. You may sell the finished product in small quantities, but please credit the owner of the pattern @tofu.soupe .
- This pattern is written in US terminology and works in continuous rounds, unless otherwise stated.
- You can use any kind of yarn and hook size you'd like, the material list only includes what kind of yarn and hook size is recommended.
-
Happy crocheting!! :D
Material list:
- Double stranded 4mm acrylic yarn in the colors: [Apple dog: white, red, black and yellow] or [Purin dog: white, red, brown and yellow]
- Optional: 3 or 4mm acrylic yarn in the colors dark brown and green (for the stem and leaf)
- 4.5mm hook and 3mm hook (for the stem and leaf)
- Black felt
- Red, green and brown felt for apple detail, or pink felt for heart detail
- Scissors
- Embroidery needle
- Polyester filling
- Stitch markers
- Glue
- Sewing pins
Abbreviations:
- ch = chain
- sl st = slip stitch
- sc = single crochet
- inc = increase
- dec = decrease
- mr = magic ring
- FO = fasten off
- BLO = back loops only
- R = round
We're going to start making the main parts! Use a 4.5mm hook
Head [in white]:
1. 6sc in mr (6)
2. 6inc (12)
3. (sc, inc)*6 (18)
4. (sc, inc, sc)*6 (24)
5. (3sc, inc)*6 (30)
6-8. sc around (30)
9. (2sc, inc, 2sc)*6 (36)
10-12. sc around [3 rounds] (36)
13. (4sc, dec)*6 (30)
14. (sc, dec)*10 (20)
- Start stuffing firmly after each round.
15. 10dec (10)
16. 5dec (5)
- FO, sew the hole closed and leave a short tail

Hood [in red or brown]:
1. 6sc in mr (6)
2. 6inc (12)
3. (sc, inc)*6 (18)
4. (sc, inc, sc)*6 (24)
5. (3sc, inc)*6 (30)
6. (2sc, inc, 2sc)*6 (36)
7. (17sc, inc)*2 (38)
8-11. Sc around [4 rounds] (38)
12. (17sc, dec)*2 (36)
- Now, continue round 13 with the hood around the head [see photo]

13. (2sc, dec, 2sc)*6 (30)
14. (3sc, dec)*6 (24)
15. (4sc, dec)*4 (20)
FO and hide tail
It is highly recommended doing an invisible FO for the hood as it will create a more seamless look, if you don’t know how to do that you can find lots of tutorials on YouTube!

Ears [in white or black]:
1. ch4, starting at the 2nd chain from the hook, 3sc, turn your work and 3sc on the other side (6)
2. (sc, inc)*3 (9)
3-4. sc around [2 rounds] (9)
5. 4sc, dec, 3sc (8)
6. dec, 6sc (7)
- Stuff lightly, FO and leave a long tail for sewing

Arms [in white]:
1. 6sc in mr (6)
2. sc around (6)
3. 3sc, stop halfway through (6)
- No need to stuff, leave a long tail for sewing

Now for the body and legs you need to work in joined rounds, meaning sl st and ch1 before each round. Note that the first 4 rounds of the body needs to be done in continuous rounds and from R5 you need to start working in joined rounds!
Body [in yellow]:
1. 6sc in mr (6)
2. 6inc (12)
3. (sc, inc)*6 (18)
4. (sc, inc, sc)*6 (24)
5. In BLO: sl st, ch1, sc around (24)
6-7. sl st, ch1, sc around [2 rounds] (24)
8. sl st, ch1, (4sc, dec)*4 (20)
- Stuff firmly, FO and leave a long tail for sewing

Legs [in white]:
1. 5sc in mr (5)
2. sl st, ch1, 5inc (10)
3. sl st, ch1, (3sc, dec)*2 (8)
- Stuff lightly, FO and leave a long tail for sewing

Now we’re going to make the details. You have two options: either make a cherry for purin dog (double stranded 4mm acrylic yarn with 4.5mm hook) or stem and leaf for apple dog (single stranded 3-4mm yarn with 3.0mm hook).
Cherry [in red]:
1. 5sc in mr (5)
2. 5inc (10)
3. sc around (10)
4. 5dec (5)
- I sewed the hole closed but you can leave it open if you prefer it that way!
- Leave a long tail for sewingggggg

Stem [in brown]:
1. 4sc in mr (4)
2. 4sc (4)
Leave a long tail for sewing
Leaf [in green]:
1. ch5, starting from the 2nd chain from the hook, sc, hdc, sc, slst, turn your work, slst, sc, hdc, sc on the other side.
Leave a long tail for sewing

Assembly:
- Sew the body against the head with the hood. It should be sewn in the center when you look from the bottom [see photo]. I personally like to go through both the hood and the head with my needle but if that doesn’t work for you, you can also just sew the hood only to the body and glue the head against the hood later on.


- Sew the ears at R8-R11 of the hood. Around 11 stitches apart. Optional: sew the ears against the hood (I sewed them at R2 of the ears).


- Sew the arms between the head and body, directly underneath the ears.
- Sew the legs between R4-R6. I also like to sew the legs together.
- Sew either the cherry or leaf and stem to the top of the head, exactly between the ears. Or!! feel free to change the placements to your likings. :]

Details:
- Using black felt, cut one nose around 1sc tall and 1,5sc wide. Glue it in the middle at around 2,5 rounds from the bottom of the hood [see photo]


- For the detail on the feet , cut out either one leaf, stem and apple for the apple detail or a heart using pink felt. The size is similar to the 1st round of the feet (mr).

... and you're done !
You have now obtained the cutest dog, good job!!
You can turn them into acute bag charm, or just have them as your desk buddy :]
If you're planning to post them on Instagram, make sure to tag me so I can see it!! @tofu.soupe