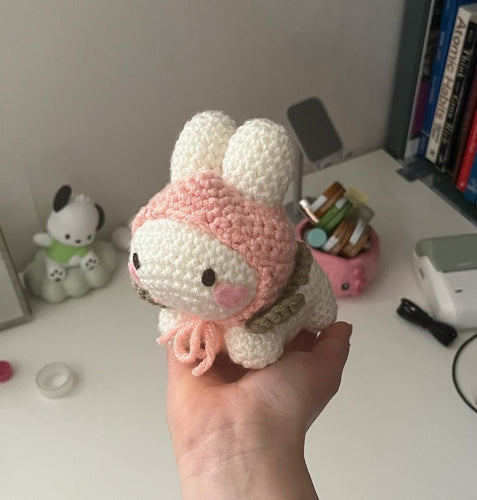
Peach Hat Free Pattern
***This hat is meant for the White Bunny Pattern, which you can find by clicking the link!***
Hey! Here you can find the free pattern for the peach hat!
Thank you so much for checking out this pattern and if you're planning to make this hat, I hope you enjoy making it(:
If you have any questions or difficulties making this hat, please feel free to dm me through Instagram: @tofu.soupe
Notes:
- This hat pattern is made for the White Bunny pattern, which you can find on this website (shop button on the menu), or my Etsy shop.
- This pattern is written in US terminology and works in joined rounds, unless otherwise stated.
- The material only includes what I’ve used for this hat, you can use any kind of yarn and hook size you’d like.
- It is recommended to make the hat with the same yarn and hook size you’ve used for the bunny.
- Have fun!!! :D
Material list:
- 5mm acrylic yarn in pink and green
- 4,5mm hook
- Embroidery needle
- Sewing pins
- Scissors
- Stitch markers
- Glue
Abbreviations:
- Ch = chain
- Mr = magic ring
- Sc = single crochet
- Inc = increase
- Dec = decrease
- Sl st = slip stitch
- FO = fasten off
Hat base (peach):
Round 1: 5sc in mr (5)
Round 2: 5inc (10)
Round 3: (sc, inc)*5 (15)
Round 4: ch21 [photo 1], skip 5 [photo 2], 9sc [photo 3] (30)


Mark the last stitch. From now on, we’re going to work in rows. Meaning ch1 and turn your work after each row.
Round 5: 25sc around (21 sc on ch, 4sc base), ch1 and turn , dec, 27sc (28)

Round 6: ch1 and turn, dec, 24sc, dec (26)
Round 7: ch1 and turn, dec, 22sc, dec (24)
Round 8: ch1 and turn, dec, 20sc, dec (22)
Round 9: sc across (22)


^ There should be just a little space (like shown on the photo) or no space at all between the hat and the neck. If you think there is too much space feel free to sc across an extra row before continuing row 10.
Round 10: ch1, turn, 5sc, dec (6)
Round 11: ch1, turn, dec, 4sc (5)
Round 12: ch1, turn, 3sc, dec (4)
Round 13: ch1, turn, 2dec, ch3 (2)

FO and leave a long tail

^ Next, we’re going to make the strap on the other side. Start with sl st and ch1 on the first stitch on the other side of the hat.
Round 1: 5sc, dec (6)
Round 2: ch1, turn, dec, 4sc (5)
Round 3: ch1, turn , 3sc, dec (4)
Round 4: ch1, turn, 2dec, ch3 (2)
FO and leave a long tail
Peach leaves (make 5):
Please note that the leaves will be made in rows and not rounds!
- 6sc in mr (6)
- ch1 and turn your work, 6inc (12)
FO and leave a long tail for sewing

- Place each leaf on the bottom of the hat like shown on the photo’s below, using sewing pins
- Start sewing each leaf on the hat


Aaaand now pat yourself on the back! Good job;D